Fluxor Blocks — DWG blocks into Revit families
What it does
Fluxor Blocks replaces the work of inserting one family at a time on top of a CAD drawing. You point out one block from the DWG and the family that should represent it; the tool scans the drawing, finds every occurrence of that same block and places the family at each point, respecting the rotation of each one.
The window stays open while you work in Revit, and the preview shows the count before anything is created.
Scenario used in this article
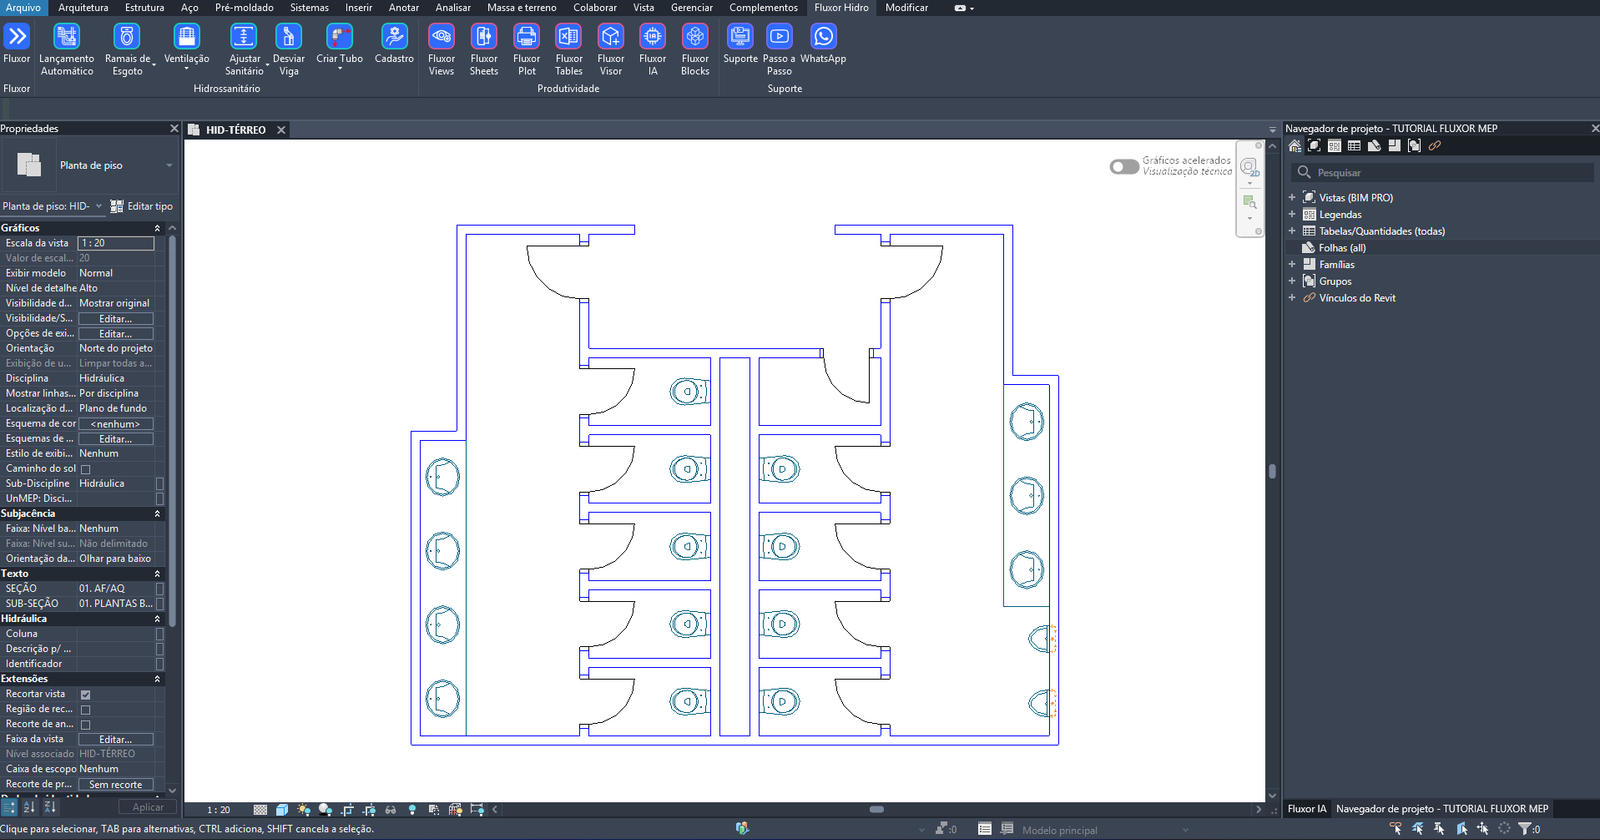
A shared restroom: the architectural DWG is linked or imported into the project, with the same toilet block repeated in every stall and the sinks along the walls. The corresponding families are already loaded in the Revit project.
It's the case where manual conversion hurts the most — the same fixture, dozens of times, each one with a different rotation. The same project is converted two ways: the toilets, directly in Revit, and the sinks, with AutoCAD's help.
Before you start
- DWG linked or imported into the project — both situations work.
- Target families loaded in the project.
- Floor plan view open, on the correct level — the elevation is measured from that view's level.
- Annual license active.
- Only for the AutoCAD path: AutoCAD open with the same drawing.
Two paths: which one to use
| Here in Revit | In AutoCAD | |
|---|---|---|
| Where you click the block | On the plan, inside Revit | On the drawing, inside AutoCAD |
| Needs AutoCAD | No | Yes, open with the drawing |
| Which occurrences to convert | Whole DWG or a rectangular region | All in the drawing, a free selection, or just one |
| Dynamic block or block within a block | May not bring the real name in an imported DWG | Always brings the real name |
Use the Revit path day to day: it's faster and doesn't depend on another program. Reach for the AutoCAD path when the drawing is imported and the block name comes back blank or unrecognizable — typical of a dynamic block — or when you need to hand-pick which fixtures to convert.
At the top of the window there's a status tag — AutoCAD connected or AutoCAD not found — and the Check button, which tests the connection on the spot.
Path A — Convert inside Revit
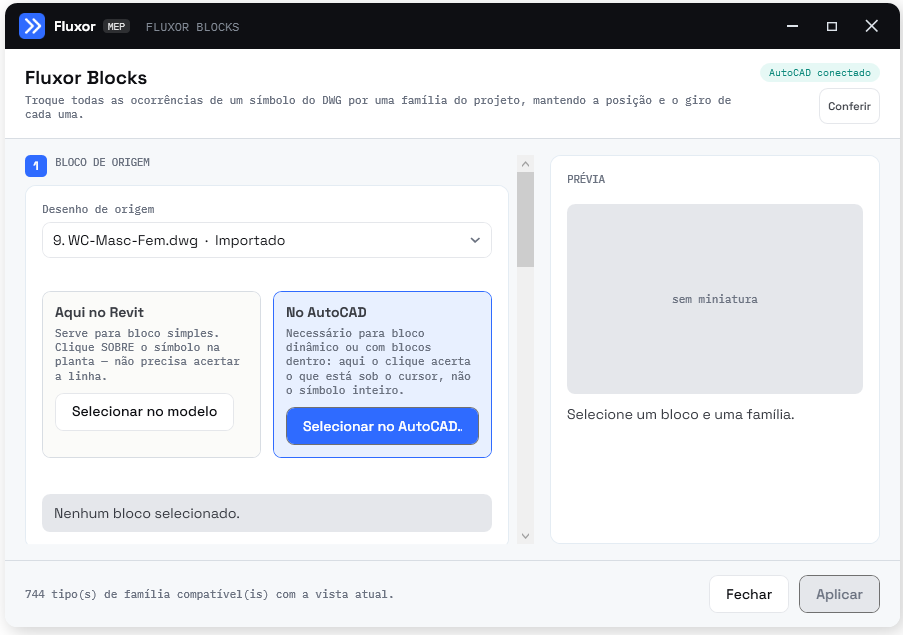
- Open the tool. On the Fluxor ribbon, Productivity panel, click Fluxor Blocks. The window stays open while you interact with Revit.
- Choose the source drawing. In the 1 · Source block card, Source drawing field, select the DWG to convert. The list brings every drawing in the project and shows whether each one is a Link or Import.
- Select the block. Click Select in model. The cursor switches to pick mode and the window moves out of the way.
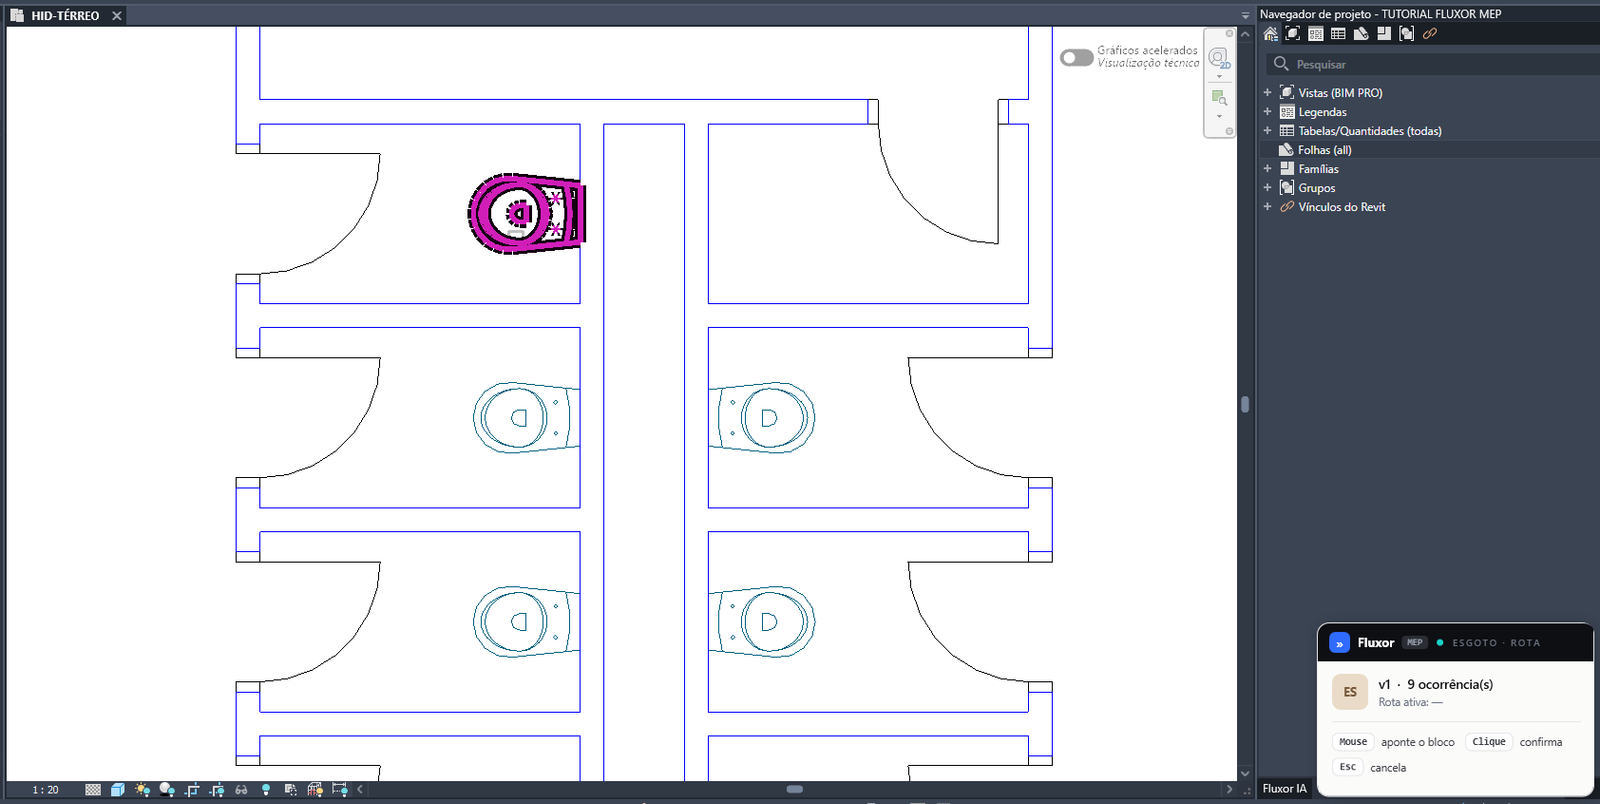
Hover over the plan: the block under the cursor lights up in magenta, as a whole, the same way AutoCAD's highlight works. You don't need to hit the line exactly — Fluxor picks it up by the stroke, the outline, or the nearest block to the cursor.
In the bottom-right corner, a panel shows the block's name and how many matching occurrences exist in the drawing. It's the batch count before you confirm anything: in the picture, block v1 with 9 occurrences. When the block was picked up by the outline rather than the stroke, the panel adds · outline.
- Click — confirms the block you pointed at.
- Esc — cancels and returns the cursor to Revit.
Once the block is confirmed, the window comes back and summarizes what was picked: name and count, the layer, and which rule resolved the click. Right below, Block identified (not nested inside another) confirms that's the outermost block — the one that will be converted.
If the stroke you clicked belongs to a block nested inside another one, that same field becomes the question Which block to convert? and lists the available nesting levels — pick the one that represents the whole fixture.
⚠️ Mirrored fixture: prefer the "as in AutoCAD" option. Revit treats the mirrored version of a block as a different symbol. When that happens, the list brings an option marked as in AutoCAD (merges mirrored), with the higher count — and that's the one you want. Without it, a batch of 7 vanities would show up as 4, and the 3 mirrored ones would be left behind with no warning. - Choose the target family. In the 2 · Target family card, click Choose family…. The label above the list says where it comes from — Families that can be placed on a floor plan —, because only what Revit accepts inserting into the open view shows up.
Type in the search field to filter: in the example, bowl. Each item brings the family thumbnail, the family name and, below it, the type — that's how you tell apart two similarly named families before converting 9 fixtures at once.
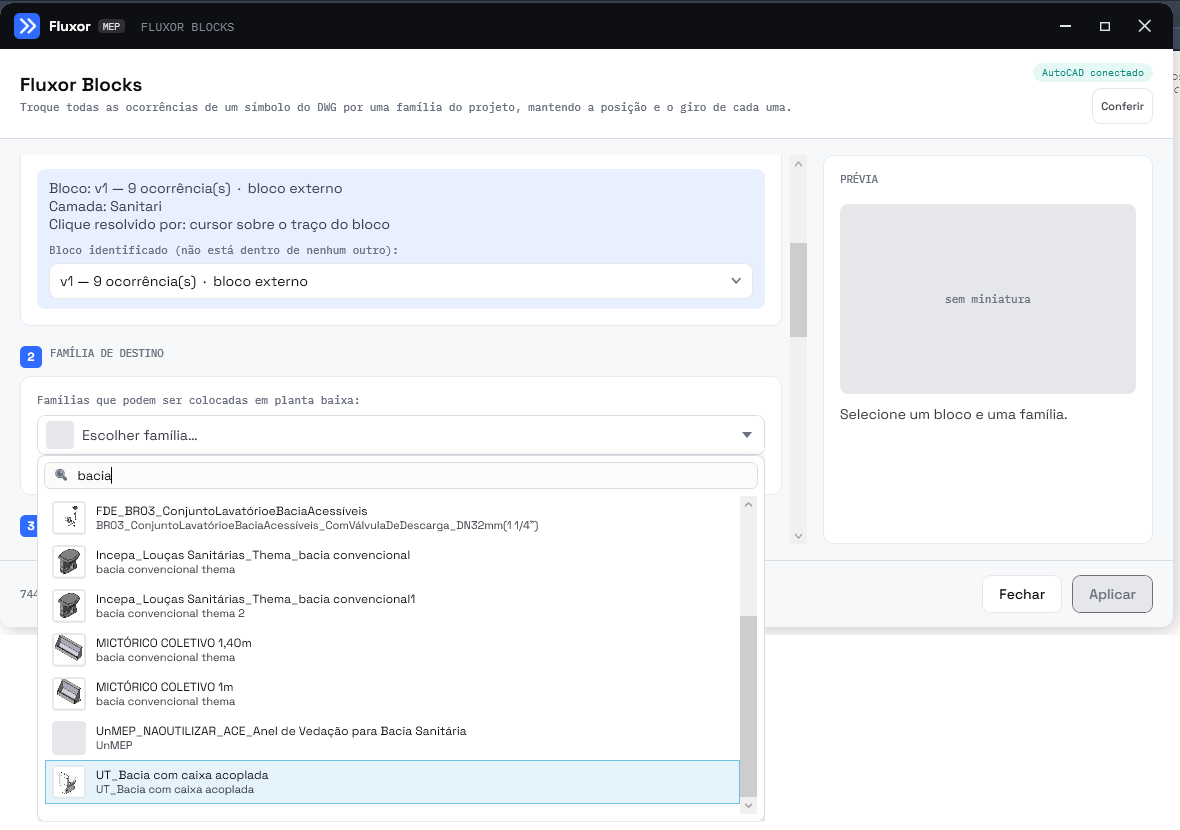
Once the family is chosen, Fluxor reports its placement type. If it's hosted, the window warns you: the orientation will come from the wall, not from the block.
- Set the scope. In the 3 · Scope card:
- Whole DWG — converts every occurrence of the chosen block in the drawing.
- Only inside a region — click Draw region (2 clicks) and outline a rectangle on the view; only what falls inside gets converted.
- Set the elevation. In the 4 · Elevation card, under Vertical offset from the view's level (mm), type the insertion height in millimeters. The 2D block is always at Z=0 in the CAD file, so the height never comes from the drawing — it comes from here.
Floor-mounted fixtures, like the toilet, get 0. A wall-hung sink uses the installation height — in the example, 900.
- Fine-tune the family adjustment. The block's insertion point and the family's rarely line up, and the same offset repeats across every occurrence. Fix it once, in the 5 · Family adjustment card, and it applies to the whole batch. There are two ways:
- Typing the values for Rotate (°), Front/back (mm) and Side (mm), with the −90°, +90°, 180° and Reset shortcuts.
- By the first fixture — the recommended method, shown in the video.
To adjust by the first fixture:
- Click 1 · Place one. Fluxor inserts one sample fixture and leaves it selected in the model.
- Move and rotate that fixture in Revit until it's exactly where it should be.
- Return to the window and click 2 · Capture adjustment. Fluxor measures how much you moved and rotated it and applies the same correction to the rest.
💡 Front and side follow the symbol, not the plan. The offset is measured in the block's own reference frame, so it follows the rotation of each occurrence: "4 in forward" points one way on a fixture against a north wall and another way on one against an east wall. That's why a single capture gets the whole batch right.If the sample fixture already lands correctly, capture the adjustment anyway — that's how the tool confirms nothing needs correcting. And one click is enough: capturing twice without moving anything doesn't change the adjustment, and Fluxor tells you so.
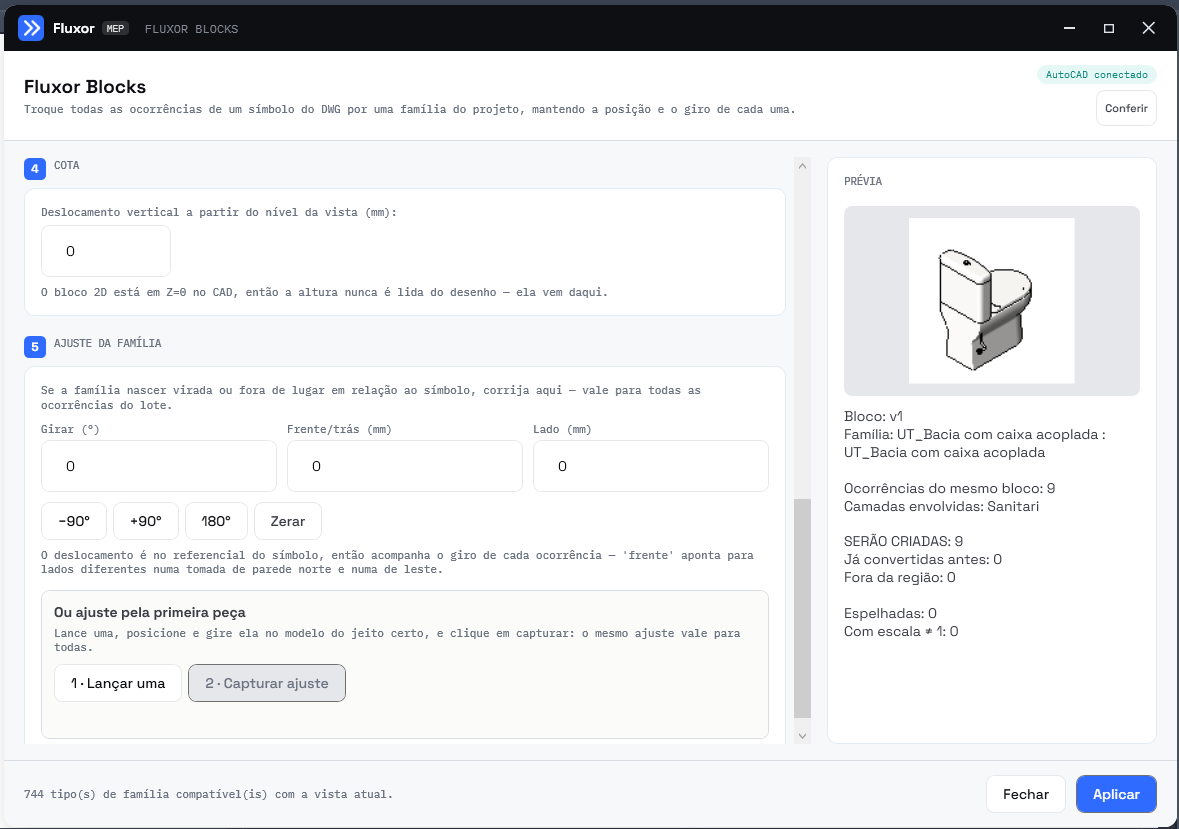
- Check the preview and apply. With block and family defined, the Preview panel — visible in the image above — shows everything that's about to happen before anything is created:
- the family thumbnail you chose, to confirm it's really the right one;
- Block and Family, with the family and type spelled out;
- Occurrences of the same block and layers involved;
- WILL BE CREATED, already converted before and outside the region;
- Mirrored and with scale ≠ 1.
In the example, block v1 has 9 occurrences on the Sanitari layer, and all 9 will be created: none repeated, none outside the region, none mirrored or scaled. If the batch spans more than one layer, Fluxor warns you — worth checking whether they're really the same symbol.
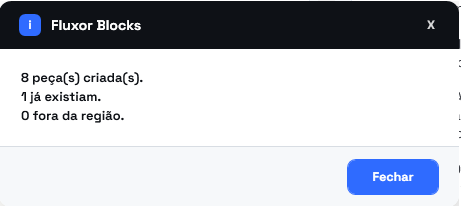
Check the numbers and click Apply. When it's done, Fluxor reports how many fixtures were created, how many already existed, and how many fell outside the region.
In the example the result is 8 created and 1 already existed — the 9 occurrences of the block. The one that "already existed" is the sample fixture from Place one: it was created during the adjustment step, and Fluxor doesn't duplicate it.
On the plan, the toilet blocks have given way to Revit families — one in each stall, at the position and rotation of each block. The sinks remain as DWG blocks: they're the batch for Path B.
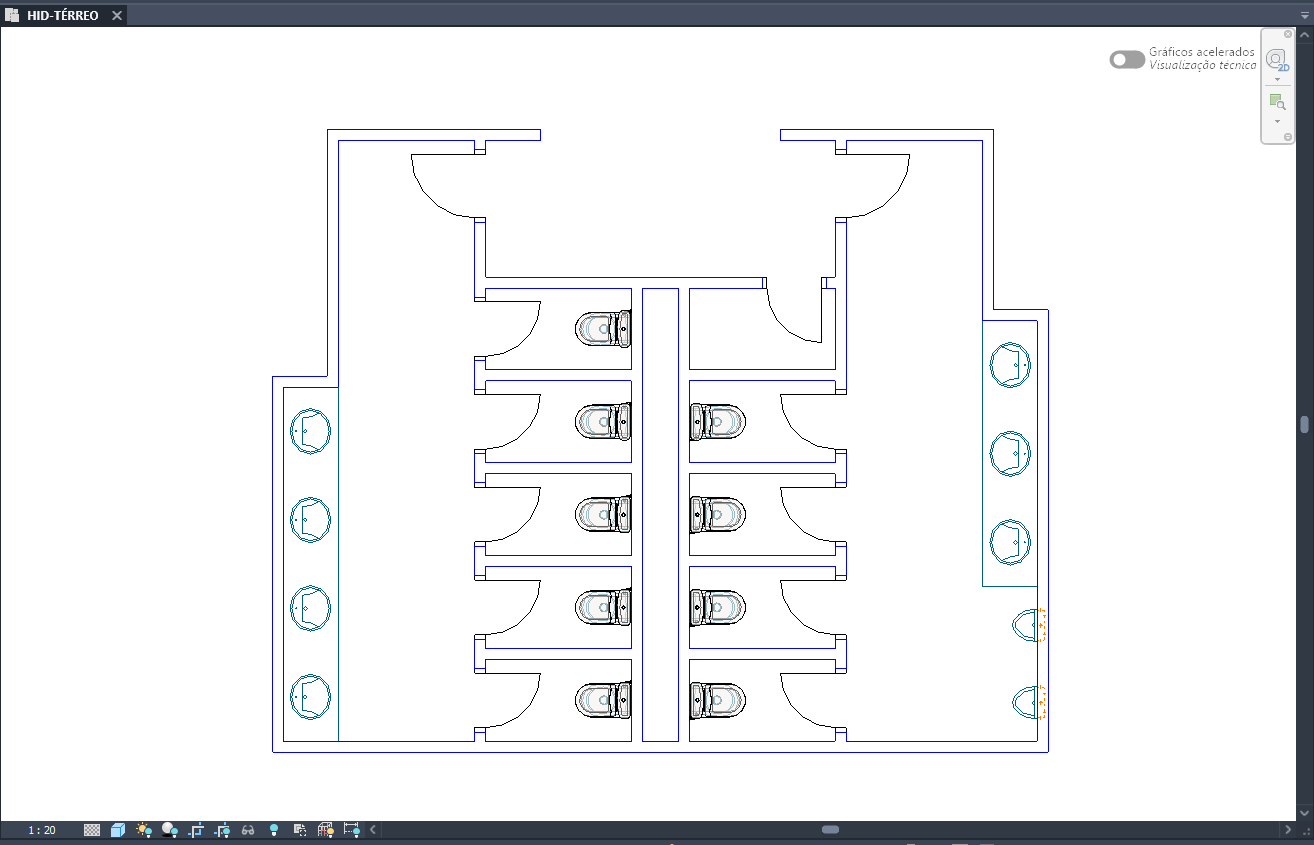
Path B — Convert with AutoCAD's help
Open the same DWG in AutoCAD and keep it open. In Revit, choose the source drawing as in Path A, then continue from here.
- Call up the selection in AutoCAD. Click Select in AutoCAD…. The Fluxor Blocks window opens by itself in AutoCAD, with the same three steps: reference block, range and send to Revit.
At the top of it your account and your plan appear, read from Revit, along with the Revit connected tag — the sign that the other side is listening. The footer of card 3 reminds you of the condition: Revit needs to have the Fluxor Blocks window open, waiting for the selection. It waits for up to three minutes.
You can also start from AutoCAD: the Fluxor Blocks button, on AutoCAD's Fluxor tab, opens the same window. Revit just needs to have the Fluxor Blocks window open. No need to type anything on the command line — the add-in is already listening once AutoCAD opens.
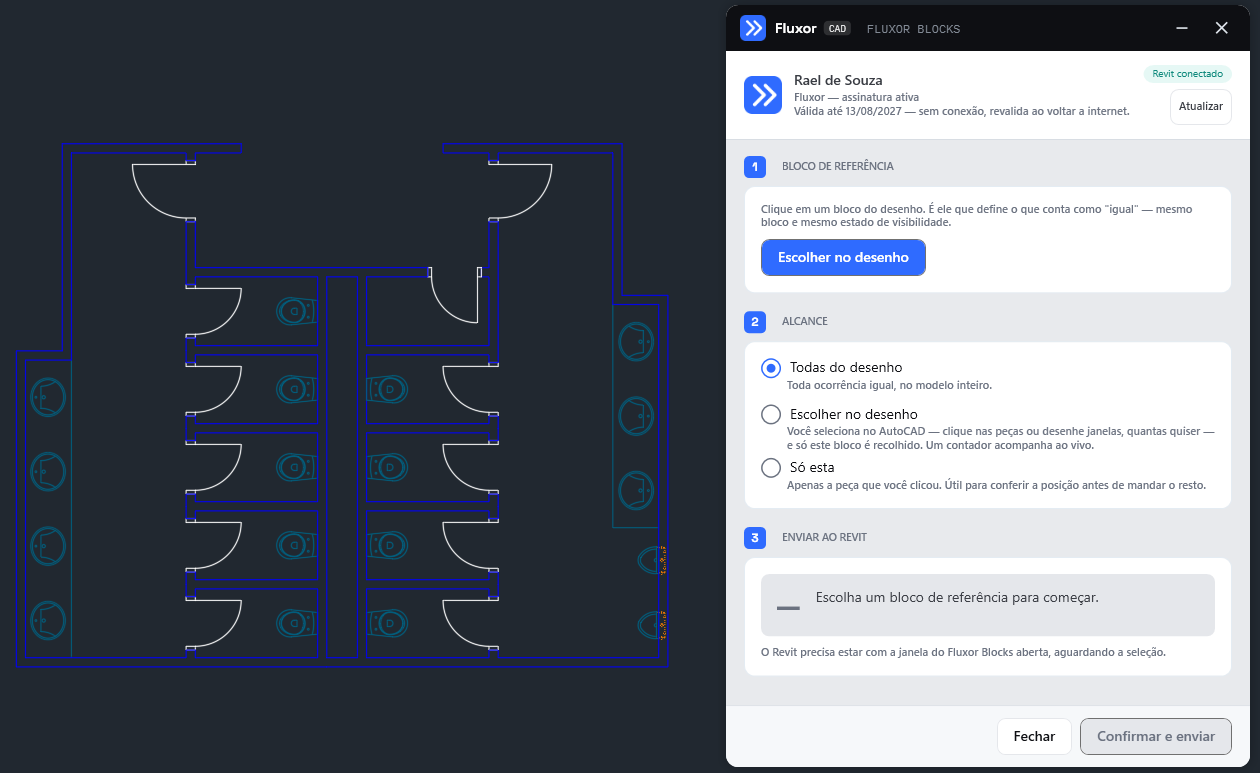
- Choose the reference block. Click Choose in drawing. The window collapses and AutoCAD prompts "Fluxor: click ONE reference block", highlighting the block under the cursor. Click the sink.
That block is what defines what counts as "the same": same block and same visibility state. For a dynamic block, that matters — two fixtures from the same block in different states don't land in the same batch.
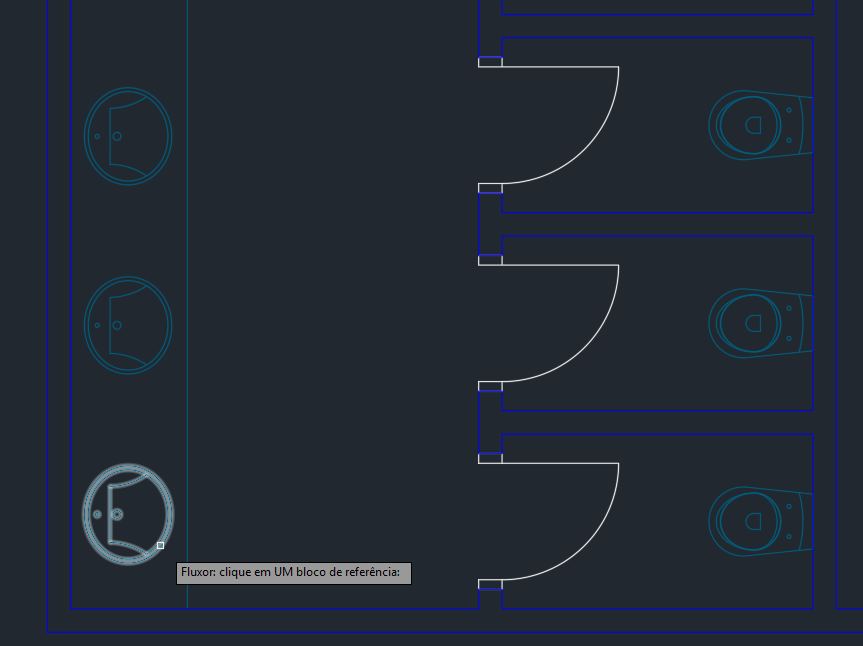
- Set the range. Once the block is chosen, card 1 shows what it is — in the example, vanity unit 032, layer Sanitari, 7 matches in the drawing. Now decide how far it goes:
- All in the drawing — every matching occurrence, across the whole model.
- Choose in drawing — click Select in drawing and build the selection in AutoCAD with as many clicks and windows as you want; a counter follows along live. Use Clear to start over.
- Just this one — only the clicked fixture, useful to check the position before sending the rest.
Card 3 · Send to Revit closes the loop: 7 occurrences ready for Revit. It's the same number that will show up on the other side.
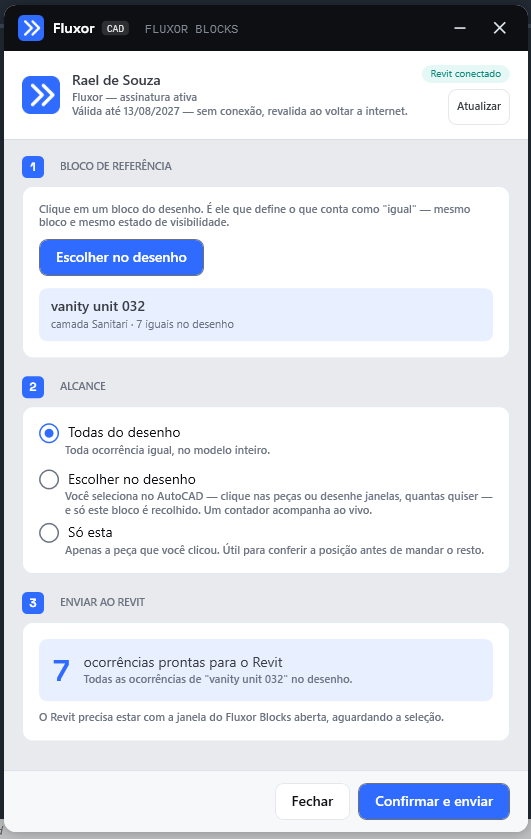
- Confirm and send. Click Confirm and send. Focus returns to Revit, and the Fluxor Blocks window shows the selected block and how many occurrences were matched against the project's drawing.
- Finish in Revit. From here on the procedure is the same as Path A: choose the target family (here, a wall-hung sink), set the elevation — 900 mm, the installation height —, and fine-tune the adjustment with Place one and Capture adjustment.
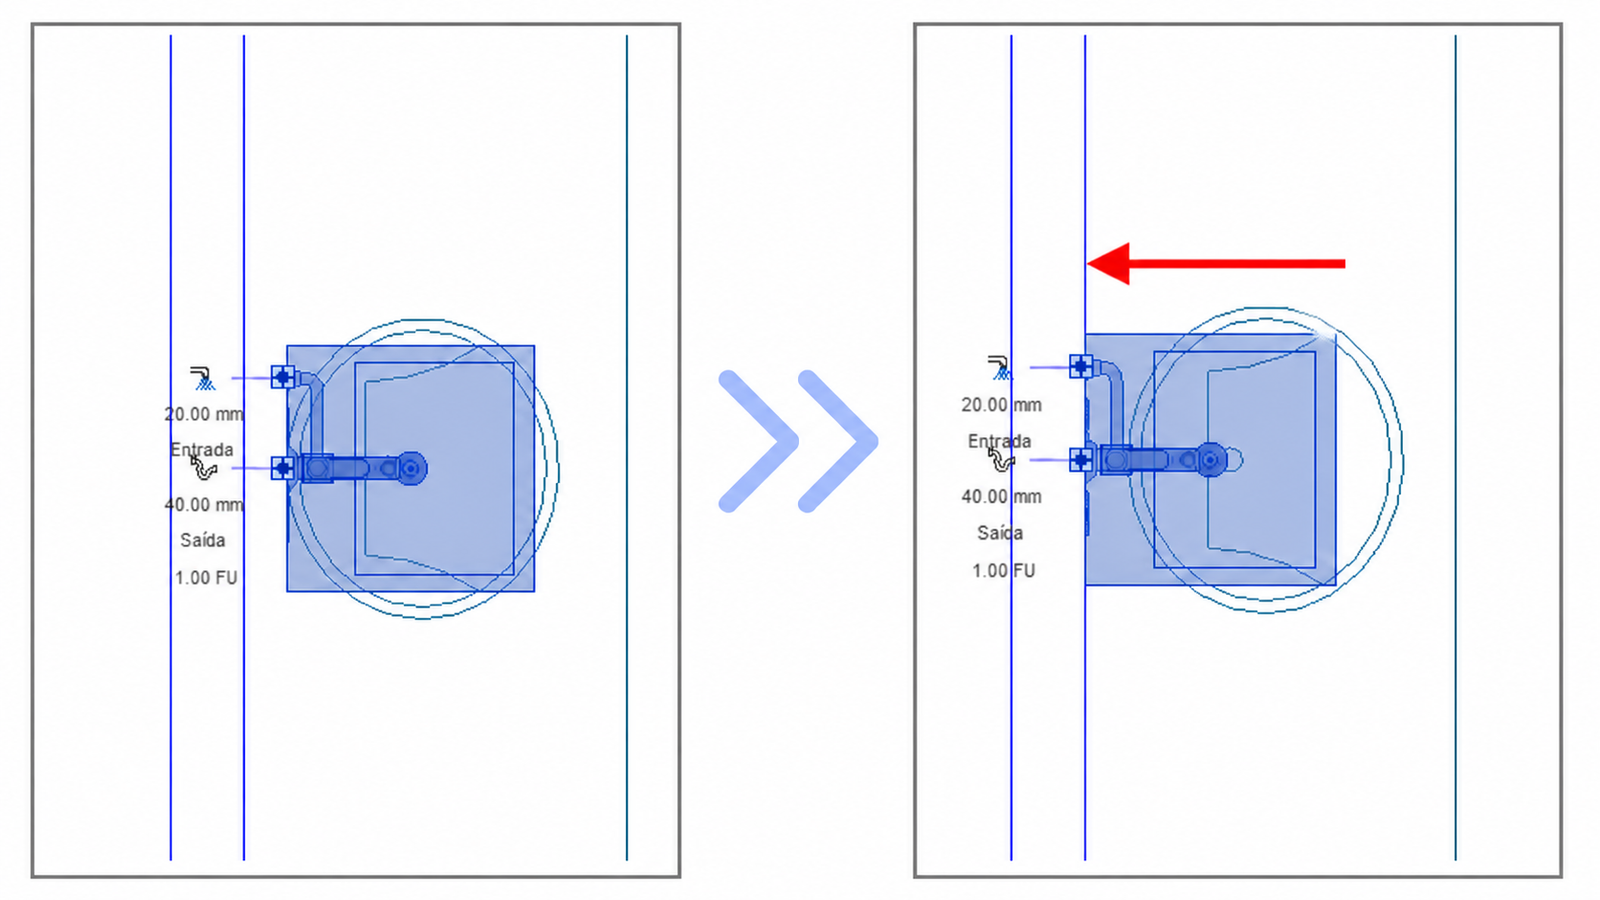
In practice the adjustment is this: the sample fixture is born offset from the CAD symbol, and you drag it to the correct position — here, flush against the wall.
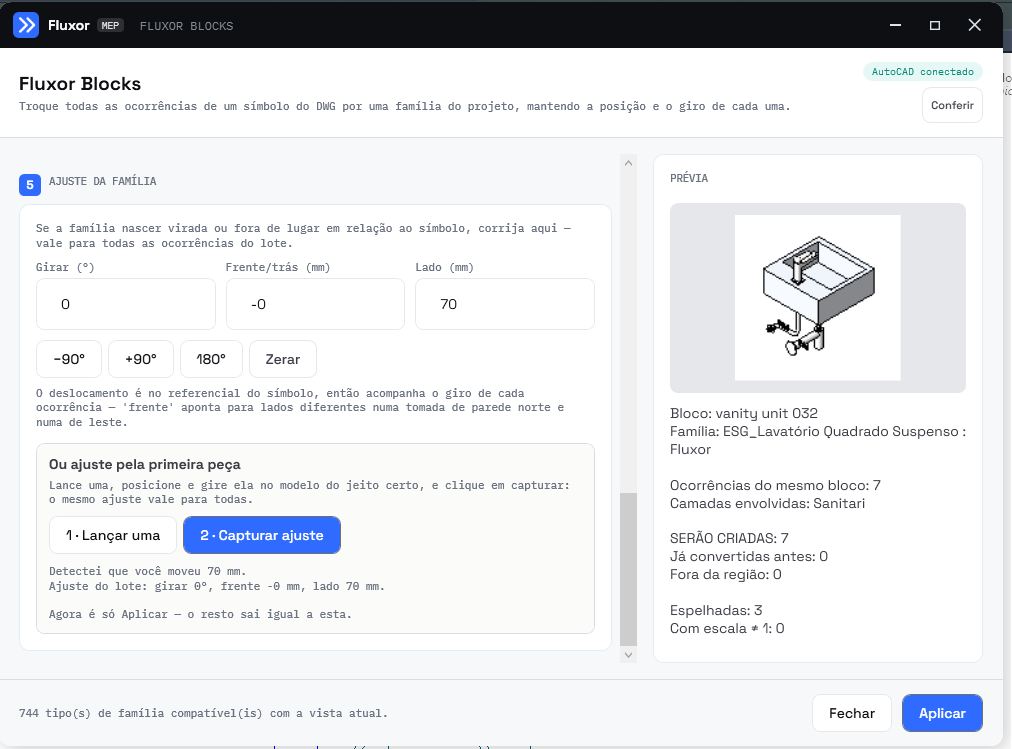
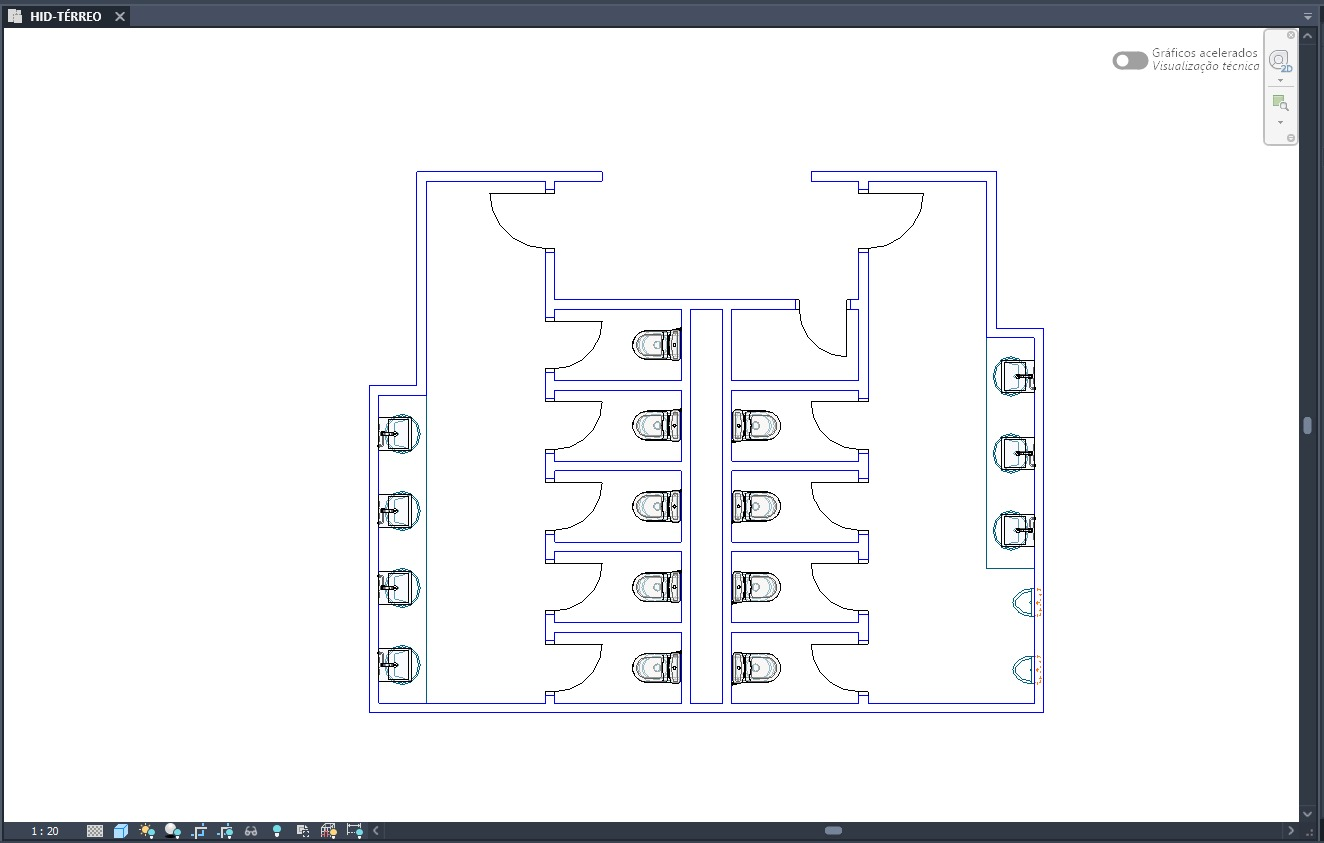
When you capture it, Fluxor tells you exactly what it measured — "Detected you moved 2.8 in. Batch adjustment: rotate 0°, front −0 mm, side 70 mm." — and closes with "now just click Apply — the rest comes out the same as this one". Alongside it, the preview confirms the batch came from AutoCAD: block vanity unit 032, 7 occurrences, 7 will be created. And notice Mirrored: 3 — those are the sinks on the opposite wall, which Revit treats as a different symbol and Fluxor brings along all the same.
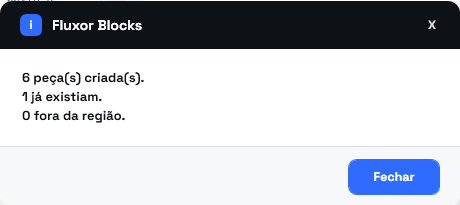
Click Apply. The result: 6 created and 1 already existed — again, the sample fixture.
On the plan, the 7 sinks take the place of the blocks — 4 on one wall and 3 on the opposite one, the mirrored ones the preview counted.
Expected result
A Revit family at every occurrence of the chosen block, at the given elevation and with the rotation of each block — ready to receive connections, schedules and any other model information.
Common errors
| Symptom | Likely cause | Solution |
|---|---|---|
| Button greyed out on the ribbon | Free or monthly plan | Fluxor Blocks is an annual-plan feature — reach out to support |
| No drawing in the list | The project has no linked or imported DWG | Link or import the drawing before opening the tool |
| Block name blank or unrecognizable | Dynamic block in an imported DWG — Revit doesn't keep the source file | Convert via the AutoCAD path |
| The family doesn't show up in the list | It can't be placed in the current view, or isn't loaded in the project | Open the correct plan and load the family |
| Captured the adjustment and nothing changed | The adjustment was captured without moving the sample fixture | Move or rotate the fixture in Revit before clicking Capture adjustment |
| AutoCAD doesn't respond to the request | Closed, no drawing open, or one of the programs is running as administrator and the other isn't | Open AutoCAD with the drawing, both in the same mode, and click again |
| Ran it again and it created 0 fixtures | The occurrences were already converted before | Expected behavior: the tool doesn't duplicate |